Connecting from Azure
Three different methods enable you to connect to your cluster from your application's virtual network in Azure. Each method offers different levels of accessibility and security. We recommend the Azure Private Endpoint method and it is the most commonly used.
Azure Private Endpoint (recommended)
While other methods for connecting your cluster from your application's virtual network in Azure are available, we strongly recommend using the Azure Private Endpoint method.
Azure Private Endpoint is a network interface that securely connects a private IP address from your Azure Virtual Network (VNet) to an external service. You grant access only to a single cluster instead of the entire BigAnimal resource virtual network, thus ensuring maximum network isolation. Other advantages include:
- You need to configure the Private Link only once. Then you can use multiple Private Endpoints to connect applications from many different VNets.
- There's no risk of IP address conflicts.
Private Endpoints are the same mechanism used by first-party Azure services such as CosmosDB for private VNet connectivity. For more information, see What is an Azure Private Endpoint?. Private Links (required by Private Endpoints) are not free, however. See Azure Private Link pricing for information on the costs associated with Private Links (required by Private Endpoints).
Note
If you setup a private endpoint and want to change to a public network, you must remove the private endpoint resources before making the change.
Private Endpoint example
This example shows how to connect your cluster using Azure Private Endpoint.
Assume that your cluster is on a subscription called development and is being accessed from a Linux client VM on another subscription called test with the following properties:
- Cluster:
- Subscription:
development - Cluster ID:
p-mckwlbakq5 - Account ID:
brcxzr08qr7rbei1 - Project ID:
brcxzr08qr7rbei1 - Region:
Japan East - Organization's domain name:
biganimal.io
- Subscription:
- Linux client VM called
vm-client:- Subscription:
test - Resource group:
rg-client - Virtual network:
vnet-client - Virtual network subnet:
snet-client
- Subscription:
Prerequisites
To walk through an example in your own environment, you need:
Your cluster URL. You can find the URL in the Connect tab of your cluster instance in the BigAnimal portal.
The IP address of your cluster. You can find the IP address of your cluster using the following command:
dig +short p-mckwlbakq5.brcxzr08qr7rbei1.biganimal.ioOutput10.240.1.218
A Postgres client, such as psql, installed on your client VM.
Note
BigAnimal automatically provisions an Azure Private Link Service for every private Postgres cluster. You can easily find this managed Private Link Service by looking for the one that has the Cluster ID in its name, like p-mckwlbakq5-rw-internal-lb.
In this example, you create an Azure Private Endpoint in your client VM's virtual network. After you create the private endpoint, you can use its private IP address to access the Postgres cluster. You must perform this procedure for every virtual network you want to connect from.
Step 1: Create an Azure Private Endpoint
Create an Azure Private Endpoint in each client virtual network that needs to connect to your BigAnimal cluster. You can create the Private Endpoint either using the Azure portal or the Azure CLI.
Using the Azure Portal
If you prefer to create the Private Endpoint using the Azure portal, on the upper-left side of the screen select Create a resource > Networking > Private Link, or in the search box enter Private Link.
Select Create.
In Private Link Center, select Private endpoints in the menu on the left.
In Private endpoints, select Add.
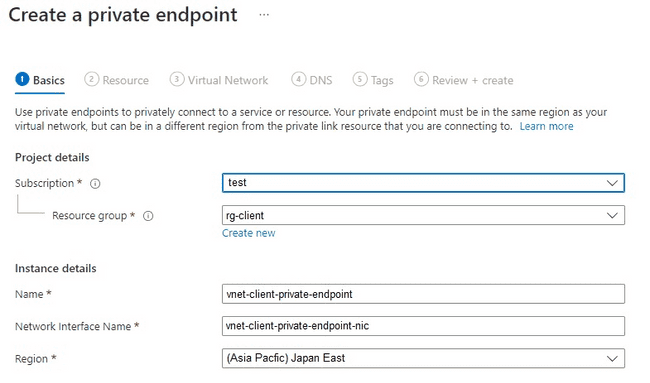
Enter the details for the private endpoint in the Basics tab:

Subscription — Select the subscription where your vm-client resides. In this case, it is
test.Resource group — Select a Resource Group in the same region where your vm-client resides. In this case, we used
rg-client.Name — Use a unique name for the private endpoint. For example, enter
vnet-client-private-endpoint, wherevnet-clientis the client VNet ID.Network Interface Name — This will take on the name of the private endpoint and append it with “-nic”.
Region — The private endpoint must be in the same region as your VNet. In this case, it is
(Asia Pacific) Japan East.
Note
In a later step, you need the private endpoint's name to get its private IP address.
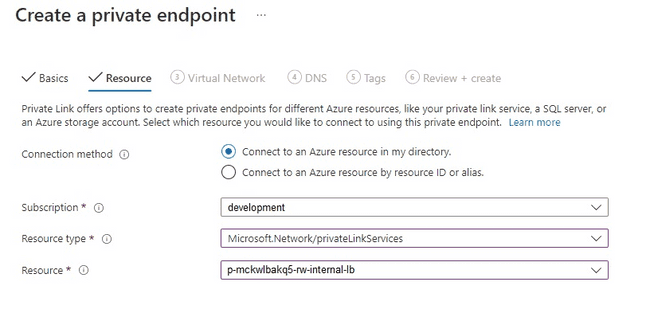
On the Resource tab, connect the private endpoint to the private link service that you created by entering the following details:

Connection Method — Select Connect to an Azure resource in my directory.
Subscription — Select the subscription in which the target BigAnimal Postgres cluster resides. In this example it is
development.Resource type — Select Microsoft.Network/privateLinkServices. This is the type of resource you would like to connect to using this private endpoint.
Resource — Select the Private Link Service resource whose name starts with the cluster ID. In this case, it is p-mckwlbakq5-rw-internal-lb.
Note
The Private Link Service is automatically created by BigAnimal in a resource group managed by Azure Kubernetes Service in the corresponding project/region. Its name follows this pattern:
MC_dp-PROJECT_ID-REGION-counter_REGION. In this example it isMC_dp-brcxzr08qr7rbei1-japaneast-1_japaneast.
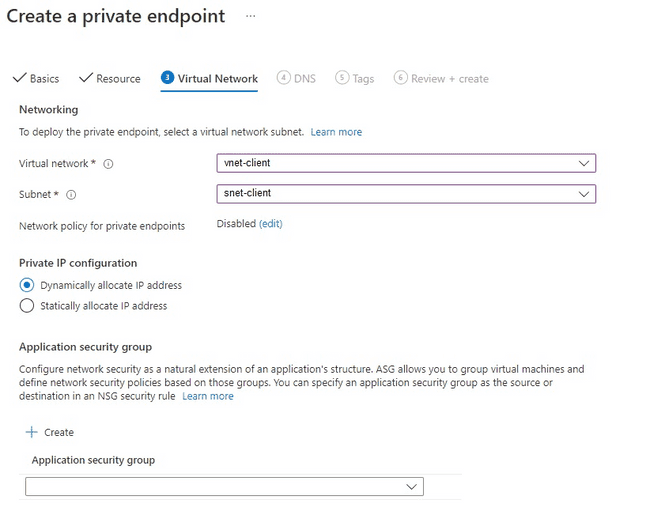
On the Virtual Network tab, enter the client VM’s Virtual Network details:

Virtual Network — Enter the VM client’s Virtual Network. In our case, this is
vnet-client.Subnet — To deploy the private endpoint, you must select a virtual network subnet that will receive the private IP address assignment. In our example, the snet client subnet has already been defined and will be assigned the private IP address. However, if a subnet has yet to be defined, you can select the default subnet, and a private IP address will be assigned.
Private IP Configuration — This defaults to Dynamically allocate IP address. In our example, we left the default.
Application security group — This can be left blank, or if you so choose, you can create and/or assign an Application Security Group. In our example, we left this blank.
You can either skip or configure both DNS and Tags as you need and then go to Review + Create.
Select Create.
Proceed to Accessing the cluster.
Using the Azure CLI
If you prefer to create the Private Endpoint using the Azure CLI, either use your local terminal with an Azure CLI profile already configured or open a new Azure Cloud Shell using the Azure portal.
Use the following Azure CLI command to create the Private Endpoint by setting these parameters:
az network private-endpoint create \
    --connection-name p-mckwlbakq5-rw-internal-lb \
    --name vnet-client-private-endpoint \
    --private-connection-resource-id "/subscriptions/00000000-0000-0000-0000-000000000000/resourceGroups/mc_dp-brcxzr08qr7rbei1-japaneast-1_japaneast/providers/Microsoft.Network/privateLinkServices/p-mckwlbakq5-rw-internal-lb" \
    --resource-group rg-client \
    --subnet snet-client \
    --vnet-name vnet-client \
    --subscription test
connection-nameneeds to be the Private Link Service name, likep-mckwlbakq5-rw-internal-lb.namewill be the Private Endpoint name, likevnet-client-private-endpoint.private-connection-resource-idis the Azure Resource Manager path of the Private Link Service.resource-groupis the Resource Group in which the Private Endpoint will be created.subnetis the Azure VNet subnet in which the Private Endpoint will be created.vnet-nameis the Azure VNet name in which the Private Endpoint will be created.subscriptionis the Azure subscription in which the Private Endpoint will be created.
Accessing the cluster
You have successfully built a tunnel between your client VM's virtual network and the cluster. You can now access the cluster from the private endpoint in your client VM. The private endpoint's private IP address is associated with an independent virtual network NIC. Get the private endpoint's private IP address using the following commands:
NICID=$(az network private-endpoint show -n vnet-client-private-endpoint -g rg-client --query "networkInterfaces[0].id" -o tsv)
az network nic show -n ${NICID##*/} -g rg-client --query "ipConfigurations[0].privateIpAddress" -o tsv
100.64.111.5
From the client VM vm-client, access the cluster by using the private IP address:
psql -h 100.64.111.5 -U edb_admin
Password for user edb_admin :

psql (13.4 (Ubuntu 13.4-1.pgdg20.04+1), server 13.4.8 (Debian 13.4.8-1+deb10))
WARNING : psql major version 13, server major version 13. Some psql features might not work.
SSL connection (protocol : TLSV1.3, cipher : TLS_AES_256_GCM_SHA384, bits : 256, compression : off) Type "help" for help.

edb_admin=>
Step 2: Create an Azure Private DNS Zone for the private endpoint
EDB strongly recommends using an Azure Private DNS Zone with the private endpoint to establish a connection with a cluster. You can't validate TLS certificates using verify-full when connecting to an IP address.
With a Private DNS Zone, you configure a DNS entry for your cluster's public hostname, and Azure DNS ensures that all requests to that domain name from your VNet resolve to the private endpoint's IP address instead of the cluster's IP address.
Note
You need to create a single Azure Private DNS Zone for each VNet, even if you are connecting to multiple clusters. If you've already created a DNS Zone for this VNet, you can skip to step 6.
In the Azure portal search for Private DNS Zones.
Select Private DNS zone.
Select Create private DNS zone.
Create a private DNS zone using your organization's domain name as an apex domain. The organization's domain name must be unique to your BigAnimal organization. For example, use
biganimal.io.
Select the Virtual network link on the Private DNS Zone page of
brcxzr08qr7rbei1.biganimal.ioand link the private DNS Zone to the client VM's virtual networkvnet-client.
Add a record for the private endpoint. The address is a private IP address—the one created with the private endpoint in the previous step.
You can now access your cluster with this private domain name.
dig +short p-mckwlbakq5.brcxzr08qr7rbei1.biganimal.io
psql -h p-mckwlbakq5.brcxzr08qr7rbei1.biganimal.io -U edb_admin
Output10.240.1.123 Password for user edb_admin: psql (13.4 (Ubuntu 13.4-1.pgdg28.84+1), server 13.4.8 (Debian 13.4.8-1+deb10)) WARNING : psql major version 13, server major version 13. Some psql features might not work. SSL connection (protocol : TLSV1.3cipherTLS_AES_256_GCM_SHA384, bits : 256, compression : off) Type "help" for help. edb_admin=>
Tip
You might need to flush your local DNS cache to resolve your domain name to the new private IP address after adding the private endpoint.